Table of Contents
Nesting privacy and anonymity services is a powerful technique for enhancing security and anonymity, especially against sophisticated threats. However, it requires technical proficiency and careful configuration to avoid introducing vulnerabilities. Always consider the specific threats you are trying to mitigate and choose the appropriate combination of services.
Introduction to Nesting
- What is Nesting?
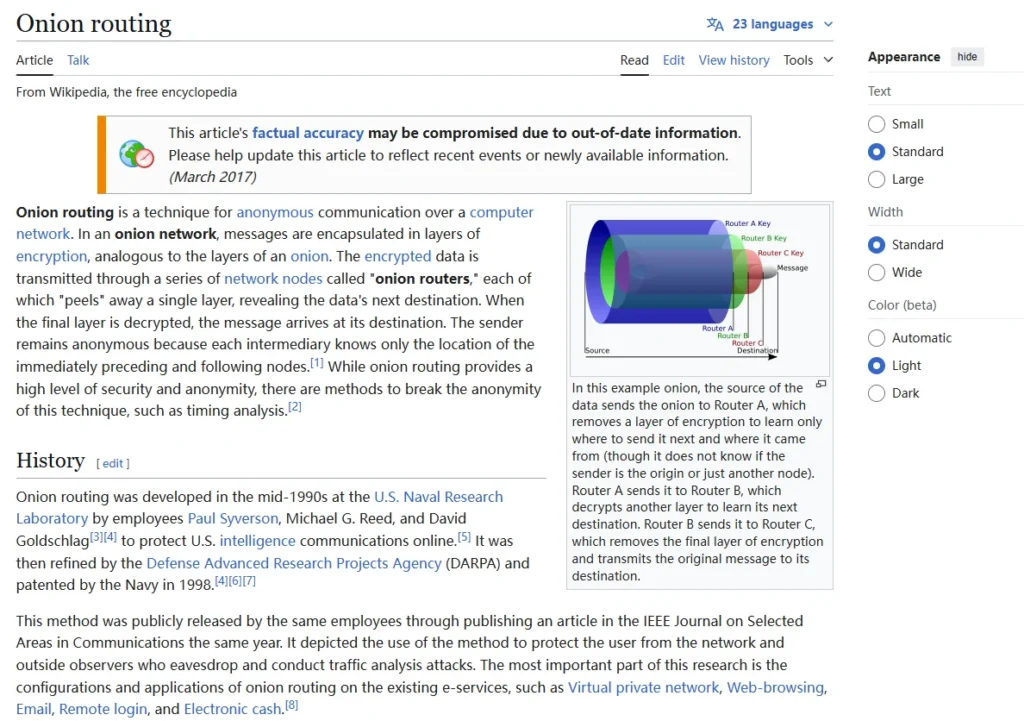
- Nesting involves sending traffic through multiple layers of privacy and anonymity services, such as proxies, VPNs, SSH tunnels, Tor, I2P, and others.
- This technique is used to enhance privacy and anonymity by adding multiple layers of protection.
- Why Nest?
- Nesting can provide stronger anonymity and privacy, especially against sophisticated adversaries.
- However, it adds complexity, which can make the setup less secure if not done correctly.
Key Services for Nesting
- Proxies:
- Proxies are generally not recommended for advanced anonymity due to their lack of encryption and potential IP leaks.
- VPNs:
- VPNs encrypt traffic between your device and the VPN server, providing a layer of privacy.
- They can be used as the first or last hop in a nested setup.
- SSH Tunnels:
- SSH tunnels provide secure, encrypted connections that can be used to route traffic through a remote server.
- Tor:
- Tor is a widely used anonymity network that routes traffic through multiple relays to obscure the source.
- It is often used as the final layer in nested setups.
- I2P (Invisible Internet Project):
- I2P is an overlay network focused on anonymous communication.
- It can be used in combination with other services for enhanced privacy.
Advantages of Nesting
- Increased Anonymity:
- Each layer adds another point of obfuscation, making it harder for adversaries to trace your traffic.
- Mitigation of Weaknesses:
- Nesting can help mitigate the weaknesses of individual services. For example, using Tor after a VPN can help protect against VPN-specific threats.
- Flexibility:
- Different combinations of services can be tailored to specific threats or use cases.
Disadvantages of Nesting
- Complexity:
- Nesting increases the complexity of the setup, which can lead to mistakes and vulnerabilities if not managed properly.
- Performance Impact:
- Each additional layer can slow down your connection, reducing speed and efficiency.
- Potential for Compromise:
- If one layer in the chain is compromised, the entire setup could be exposed.
Common Nesting Configurations
- VPN + Tor:
- Traffic is routed through a VPN first, then through Tor.
- This setup can protect against VPN-specific threats while leveraging Tor’s anonymity.
- SSH + Tor:
- Traffic is routed through an SSH tunnel, then through Tor.
- This is useful for secure, encrypted connections with anonymity.
- ConnectOverSSH · Wiki · Legacy / Trac · GitLab
- VPN + I2P:
- Traffic is routed through a VPN, then through I2P for anonymous communication.
- Multiple Layers (e.g., VPN + Tor + I2P):
- Traffic is routed through multiple layers for maximum anonymity and security.
Practical Examples
- VPN as the First Hop:
- Your ISP sees VPN traffic, while the VPN server sees your real IP address.
- The VPN server’s IP is presented to the Tor guard relay, and the Tor network hides your identity from the destination.
- Tor as the First Hop:
- Your ISP sees Tor traffic, and the Tor guard relay sees your real IP address.
- The Tor exit relay’s IP is presented to the VPN server, which hides the fact that you are using Tor.
Using SSH, VPN, or JondoNym as the First Hop in a Nested Setup
Why Use SSH, VPN, or JondoNym as the First Hop?
- Circumventing Network Restrictions:
- If your ISP, country, or local network blocks Tor (e.g., Tor relays, pluggable transports), you can use SSH, VPN, or JondoNym to bypass these restrictions.
- These services may not be blocked, allowing you to route traffic through them before entering the Tor network.
- Trust in the First Hop:
- If you trust the security of SSH, VPN, or JondoNym more than your ISP, you can use them to protect against Tor de-anonymization attacks.
- For example, if a traffic correlation attack or Sybil attack is targeting Tor users, the first hop (SSH/VPN/JondoNym) can provide an additional layer of abstraction, hiding your real IP address from the Tor guard relay.
- Protection Against Traffic Injection Attacks:
- If an attacker exploits a vulnerability in your browser or system to force traffic outside Tor (e.g., via UDP), a properly configured VPN or SSH can prevent your real IP address from being exposed.
- The traffic will appear as coming from the VPN/SSH server, not your real IP.
- Access to Tor Hidden Services:
- Using SSH, VPN, or JondoNym as the first hop allows you to access Tor hidden services, which is not possible if Tor is the first hop.
Potential Risks and Disadvantages
- Configuration Complexity:
- SSH, VPN, or JondoNym can leak DNS or IPv6 if not configured correctly.
- If the connection drops, traffic may be sent in the clear, exposing your real IP address.
- Proper firewall rules and configuration are required to mitigate these risks.
- Manual Setup Risk:
- If the setup is manual, you might forget to enable the tunnel, leading to accidental direct connections to Tor or other services.
- This could be risky in environments where using Tor is illegal or monitored.
- Traffic Fingerprinting:
- VPNs and SSH may not fully hide the fact that you are using Tor from your ISP or other observers.
- A sophisticated adversary could use website traffic fingerprinting to detect that you are using Tor, even if you are routing traffic through a VPN or SSH.
- No Protection from Malicious Tor Exit Nodes:
- If the Tor exit node is malicious, it can monitor or inject traffic into non-SSL/non-encrypted traffic.
- This setup does not protect you from malicious Tor exit nodes, unlike using SSH/VPN/JondoNym as the final hop.
- Suspicion from Adversaries:
- Using a nested setup (e.g., VPN + Tor) may make you more suspicious to adversaries, as it highlights you as a technical user with high anonymity needs.
- This could attract unwanted attention compared to using Tor alone.
- Destination Bans:
- If the destination website or service bans Tor exit nodes, this setup will not work.
- Money Trail:
- In most cases, there is a money trail back to you when using paid VPNs, SSH, or JondoNym services.
- Unless you use anonymous payments or free services, your identity could be linked to the service provider.
Advanced Configurations
- Multi-Hop Setup:
- Using two VPNs or SSH tunnels (e.g., VPN1 → VPN2 → Tor) can add complexity and distance, mitigating potential logging risks.
- The second VPN or SSH should not have a connection back to your real IP address, and there should be no money trail.
- TLS Wrapping:
- You can wrap the SSH or VPN tunnel with TLS using tools like S-Tunnel to hide the fact that you are using SSH or VPN.
- This mimics HTTPS traffic, helping you fly under the radar of local adversaries, ISPs, or observers.
- Free vs. Paid Services:
- Using free versions of JondoNym or VPNs (e.g., Free JondoNym → Tor → Internet) may be the most anonymous way to access hidden services, but it will be slower.
- For faster performance, consider using paid VPNs or JondoNym with anonymous payments.
Comparison of proxifiers – Wikipedia
Using SSH, VPN, or JondoNym as the first hop in a nested setup can provide significant advantages, such as bypassing network restrictions, protecting against traffic injection attacks, and accessing Tor hidden services. However, it also introduces risks, including configuration complexity, potential leaks, and suspicion from adversaries.
Using Tor as the First Hop in a Nested Setup
Why Use Tor as the First Hop?
- Protection Against Tor Exit Node Manipulation:
- If you’re concerned that Tor exit nodes may be viewing or manipulating your traffic, adding an additional layer of encryption (e.g., SSH, VPN, or JondoNym) as the last hop can mitigate this risk.
- This setup ensures that even if the Tor exit node is malicious, your traffic remains encrypted until it reaches the final hop.
- Bypassing Destination Restrictions:
- If your destination blocks Tor but allows SSH, VPN, or JondoNym, this setup can help you bypass such restrictions while still benefiting from Tor’s anonymity.
- Hiding Tor Usage:
- If you don’t want your destination to know that you’re coming from a Tor exit node, this setup disguises your traffic as coming from the SSH, VPN, or JondoNym server.
- Anonymity to the Final Hop:
- Tor hides your real IP address from the SSH, VPN, or JondoNym server.
- Any logs created by these services will only show the IP address of the Tor exit node, providing an additional layer of anonymity.
- Specific Location Requirements:
- If your destination blocks Tor exit nodes but you need to appear as though you’re coming from a specific location (e.g., a VPN server in a particular country), this setup allows you to achieve that while still using Tor for anonymity.
- No Money Trail:
- If you’ve never connected directly to the SSH, VPN, or JondoNym server from your real IP address, and you’re using anonymous payments or free services, these providers cannot identify you.
- This setup is particularly effective if you’re using JondoNym, which provides additional hops and anonymizing features.
Potential Risks and Disadvantages
- Trust in the Final Hop:
- You are trusting the security of SSH, VPN, or JondoNym more than Tor to protect your identity.
- If the SSH or VPN provider is compromised, it could lead to de-anonymization, especially if there is a money trail or if you’ve ever connected to the service directly from your real IP address.
- Money Trail Risk:
- If you’ve ever paid for the SSH, VPN, or JondoNym service using non-anonymous methods, there is a potential money trail that could link you to the service.
- This completely undermines the anonymity provided by Tor.
- OPSEC Requirements:
- If you accidentally connect directly to the SSH, VPN, or JondoNym server from your real IP address, you risk being logged and de-anonymized.
- This setup requires excellent operational security (OPSEC) to avoid creating a trail back to your real identity.
- Vulnerability to Correlation Attacks:
- If your adversary controls the SSH or VPN server, they can perform end-to-end correlation and timing attacks over time, potentially de-anonymizing you.
- This risk is slightly mitigated with JondoNym due to its multiple hops, but it still exists.
- Traffic Visibility:
- The final hop (SSH, VPN, or JondoNym) can see your internet traffic if it’s not encrypted.
- Using TLS or other encryption methods is essential to prevent de-anonymization.
- ISP and Local Observer Awareness:
- Your ISP or local observers will still be able to see that you’re using Tor, which may raise red flags and put you on a watchlist.
- This could be a problem in environments where Tor usage is monitored or restricted.
- Tor’s TCP-Only Limitation:
- Tor only supports TCP traffic, which makes tunneling UDP-based protocols (like OpenVPN) slower and more difficult to set up.
- Stream Isolation Issues:
- This setup does not provide stream isolation, meaning that all your traffic will go in and out of the same final hop.
- If you use the same connection for multiple aliases, an observer could correlate those aliases together, reducing your anonymity.
- Browser Configuration Challenges:
- Depending on how you set up the chain, you may not be able to use the Tor Browser, forcing you to harden your own browser.
- An unhardened browser could leak your anonymity, making you vulnerable to tracking.
Advanced Considerations
- Multi-Hop Solutions:
- Adding multiple layers (e.g., SSH → VPN → Tor → JondoNym) can increase complexity but also provide additional anonymity and protection against certain threats.
- Each additional layer adds more distance and mitigates potential logging risks.
- TLS Wrapping:
- You can wrap the SSH or VPN tunnel with TLS using tools like S-Tunnel to hide the fact that you’re using SSH or VPN.
- This mimics HTTPS traffic, helping you fly under the radar of local adversaries, ISPs, or observers.
- Tor Project’s View on Chaining:
- According to the Tor Project, chaining services can make passive attacks slightly harder but active attacks easier due to the increased attack surface.
- Chaining is most effective against colluding Tor nodes or Black Hat hackers targeting Tor client code.
- If the final hop (SSH/VPN) is controlled by an adversary, it weakens the protection provided by Tor.
Connecting to Tor before a Proxy
Using Tor as the first hop in a nested setup can provide significant advantages, such as protecting against Tor exit node manipulation, bypassing destination restrictions, and hiding your Tor usage. However, it also introduces risks, including the potential for de-anonymization if the final hop is compromised or if there is a money trail.
To mitigate these risks, ensure proper configuration, use multi-hop setups, and consider wrapping your tunnels with TLS. Always weigh the benefits against the potential downsides based on your specific threat model.
Nested VPNs: Enhancing Privacy and Anonymity
Introduction to Nested VPNs
- Why Nested VPNs?
- If privacy and anonymity truly matter to you, you cannot trust a single VPN provider.
- Nested VPNs involve routing traffic through multiple VPN providers to distribute trust and reduce the risk of compromise.
- How Nested VPNs Work:
- Traffic is routed through one VPN provider, then through another, and so on.
- Each VPN provider only knows the IP address of the previous VPN exit node and the next VPN entry node.
- This prevents any single VPN provider from knowing both your real IP address and the destination server’s IP address.
Advantages of Nested VPNs
- Distributed Trust:
- By using multiple VPN providers, you distribute the trust across different entities, making it harder for any single provider to compromise your privacy.
- Neither VPN provider knows both your ISP-assigned IP address and the destination server’s IP address.
- Increased Anonymity:
- Nested VPNs make it more difficult for adversaries to perform end-to-end correlation attacks (traffic confirmation attacks), as they would need to compromise multiple VPN providers.
- Flexibility:
- You can use multiple VPNs from different providers and jurisdictions, further complicating any potential tracking efforts.
Disadvantages of Nested VPNs
- Performance Issues:
- Each additional VPN layer adds latency, reduces speed, and can impact reliability.
- Bouncing traffic through multiple VPNs across the globe can significantly degrade performance.
- Complexity:
- Setting up and maintaining nested VPNs requires technical expertise and careful configuration.
- Mistakes in configuration can lead to leaks or compromise.
- Cost and Reliability:
- Using multiple VPNs can be costly, especially if you need to pay for premium services.
- Free VPNs may be an option, but they often come with performance and reliability issues.
Setting Up Nested VPNs
- Direct vs. Indirect VPNs:
- The direct VPN (first VPN) should only know your ISP-assigned IP address.
- The indirect VPN (second VPN) should only know the IP address of the destination server.
- Always connect to the direct VPN first, followed by the indirect VPN.
- Money Trail Considerations:
- To maintain anonymity, ensure there is no money trail linking you to the indirect VPN.
- Use anonymous payment methods like Bitcoin, cash, or other untraceable options.
- Pay via anonymizing networks (e.g., Tor) to hide your payment source.
- Geopolitical Considerations:
- Choose VPN providers in jurisdictions that are outside the sphere of influence of your adversary.
- Avoid providers in countries with extradition treaties or cooperative relationships with your adversary.
- For the indirect VPN, prioritize providers in non-cooperative locations (e.g., countries without extradition treaties with your adversary).
Risks and Mitigations
- Traffic Confirmation Attacks:
- Nested VPNs are still susceptible to traffic confirmation attacks, where adversaries measure traffic entering and exiting the VPNs to correlate data.
- To mitigate this, choose VPN providers in jurisdictions that are difficult for your adversary to influence.
- Targeted Attacks:
- Adversaries can perform DDoS attacks on VPN servers or users to create timing variations, potentially de-anonymizing the user.
- Use VPN providers in geopolitically neutral or non-cooperative locations to reduce the risk of targeted attacks.
- OPSEC (Operational Security):
- Always use the VPNs in the correct order (direct first, indirect second).
- Avoid creating any link between your real identity and the indirect VPN.
Advanced Configurations
- Multi-Hop VPNs:
- You can use three or more VPNs to further distribute trust and increase anonymity.
- Alternate between neutral and non-cooperative locations for each VPN.
- Combining VPNs with Tor:
- You can combine nested VPNs with Tor for increased fragmentation, privacy, and anonymity.
- Traffic can be tunneled through multiple anonymizing systems simultaneously.
Nested VPNs provide a powerful way to enhance privacy and anonymity by distributing trust across multiple VPN providers. However, they come with trade-offs in terms of performance, complexity, and cost. To mitigate risks, ensure proper configuration, use anonymous payment methods, and choose VPN providers in geopolitically secure locations.
Always consider your specific threat model and the resources of your adversary when deciding whether nested VPNs are the right solution for you.
Setting Up Nested VPNs: Technical Guide
Introduction to Nested VPNs
- Why Set Up Nested VPNs?
- Nested VPNs distribute trust across multiple VPN providers, making it harder for any single provider to compromise your privacy.
- This setup ensures that no single VPN provider knows both your real IP address and the destination server’s IP address.
Setting Up Nested VPNs
- Using a Virtual Machine (VM):
- Direct VPN Client: Install the direct VPN client on your host operating system.
- Indirect VPN Client: Install the indirect VPN client on a guest operating system within a virtual machine.
- Steps:
- Connect the direct VPN first.
- Start the virtual machine.
- The virtual machine connects to the indirect VPN through the host operating system.
- Advantages:
- Simple and safe, especially if both VPN clients have kill switches and leak protection.
- Adds two layers of firewalls for enhanced security.
- Using a Hardware Router or Firewall:
- Direct VPN Client: Install the direct VPN client on a hardware router or firewall (e.g., PF Sense or DD-WRT).
- Indirect VPN Client: Install the indirect VPN client on a specific machine (host or guest OS).
- Advantages:
- More configurable with advanced firewall rules.
- Can force specific devices or Ethernet ports to use the VPN.
- Can run permanently for continuous protection.
- Using Off-the-Shelf VPN Routers:
- Direct VPN Client: Use an off-the-shelf VPN router for the direct connection.
- Indirect VPN Client: Install a second VPN client on the router’s operating system.
- Advantages:
- Easier to set up for non-technical users.
- Provides a simple way to chain VPNs.
- Using Virtual Routers (PF Sense):
- Direct VPN Client: Set up a virtual router (e.g., PF Sense) as the direct VPN client.
- Indirect VPN Client: Set up a second virtual router or VPN client within the same environment.
- Advantages:
- Allows for multi-hop VPNs by chaining multiple virtual routers.
- Highly configurable with advanced firewall and routing options.
Detailed Steps for PFSense
- Setting Up PF Sense:
- Adapter 1: NAT (Network Address Translation) for the first VPN connection.
- Adapter 2: Internal network for the second VPN connection.
- Steps:
- Configure the first PF Sense instance as the direct VPN client.
- Set up a second PF Sense instance as the indirect VPN client.
- Chain the VPN connections by forwarding traffic between the two PF Sense instances.
- Creating Multi-Hop VPNs:
- First Hop: PF Sense instance 1 connects to the first VPN.
- Second Hop: PF Sense instance 2 connects to the second VPN.
- Third Hop: Optionally, add a third VPN client within the second PF Sense instance.
Key Considerations
- Kill Switches and Leak Protection:
- Ensure both VPN clients have kill switches and leak protection to prevent accidental traffic leaks.
- Firewall Rules:
- Use firewalls on both the host and guest systems to enforce VPN usage and prevent leaks.
- Order of Connections:
- Always connect the direct VPN first, followed by the indirect VPN.
- The indirect VPN should never connect directly to your real IP address.
- Anonymous Payments:
- Use anonymous payment methods (e.g., Bitcoin, cash) for the indirect VPN to avoid creating a money trail.
- Free VPNs can also be used for the indirect connection, but they may have performance limitations.
How to use onion over VPN | The ultimate guide to using a VPN with Tor
Onion Over VPN: Layers of Ultimate Online Security | NordVPN
The best no-log VPN: Online privacy you can trust | NordVPN
Setting up nested VPNs can significantly enhance your privacy and anonymity by distributing trust across multiple VPN providers. The setup can be achieved using virtual machines, hardware routers, off-the-shelf VPN routers, or virtual routers like PF Sense.
To ensure maximum security, use kill switches, firewall rules, and anonymous payment methods. Always follow the correct order of connections and test your setup to avoid leaks or configuration errors.
Setting Up Nested SSH Tunnels
Introduction to Nested SSH
- Why Use Nested SSH?
- Nested SSH tunnels allow you to route your traffic through multiple SSH servers, enhancing privacy and anonymity by adding multiple layers of encryption and obfuscation.
- This setup is particularly useful when you want to create secure tunnels for browsing or other internet activities.
Basic SSH Shell Bouncing
- Command for Shell Bouncing:
- To bounce over multiple SSH servers and get a shell on a distant machine, you can use the following command:
ssh -v -t demo.offsce.com ssh -t demo2.offsce.com ssh -t demo3.offsce.com - Explanation:
v: Verbose mode to see detailed output.t: Force pseudo-terminal allocation (required for nested SSH).demo.offsce.com,demo2.offsce.com,demo3.offsce.com: The SSH servers you are bouncing through.
- Steps:
- Enter the password for the first SSH server (
demo.offsce.com). - Enter the password for the second SSH server (
demo2.offsce.com). - Enter the password for the third SSH server (
demo3.offsce.com). - You now have a shell on the third server (
demo3.offsce.com).
- Enter the password for the first SSH server (
- To bounce over multiple SSH servers and get a shell on a distant machine, you can use the following command:
Creating SSH SOCKS Proxy Tunnels
- Two-Hop SSH Tunnel:
- To create a dynamic SSH SOCKS proxy tunnel through two SSH servers, use the following command:
ssh -v -D 8080 demo.offsce.com ssh -D 8080 demo2.offsce.com - Explanation:
D 8080: Creates a dynamic SOCKS proxy on port 8080.demo.offsce.com: The first SSH server.demo2.offsce.com: The second SSH server.
- Steps:
- Connect to the first SSH server (
demo.offsce.com) and enter the password. - The command creates a dynamic SOCKS proxy on port 8080 on the second SSH server (
demo2.offsce.com). - Configure your browser or application to use the SOCKS proxy on
127.0.0.1:8080. - Your traffic will now be routed through
demo.offsce.comanddemo2.offsce.com.
- Connect to the first SSH server (
- To create a dynamic SSH SOCKS proxy tunnel through two SSH servers, use the following command:
- Three-Hop SSH Tunnel:
- To create a dynamic SSH SOCKS proxy tunnel through three SSH servers, use the following command:
ssh -v -L 55555:localhost:55555 demo.offsce.com ssh -L 55555:localhost:55555 demo2.offsce.com ssh -D 55555 demo3.offsce.com - Explanation:
L 55555:localhost:55555: Local port forwarding to forward traffic between the SSH servers.D 55555: Creates a dynamic SOCKS proxy on port 55555 on the third SSH server (demo3.offsce.com).
- Steps:
- Connect to the first SSH server (
demo.offsce.com) and enter the password. - Connect to the second SSH server (
demo2.offsce.com) and enter the password. - The command creates a dynamic SOCKS proxy on port 55555 on the third SSH server (
demo3.offsce.com). - Configure your browser or application to use the SOCKS proxy on
127.0.0.1:55555. - Your traffic will now be routed through
demo.offsce.com,demo2.offsce.com, anddemo3.offsce.com.
- Connect to the first SSH server (
- To create a dynamic SSH SOCKS proxy tunnel through three SSH servers, use the following command:
Mixing VPN and SSH
- Combining VPN and SSH:
- You can mix VPN and SSH to create even more secure and complex tunnels.
- Example Setup:
- Host OS: Run the VPN client.
- Guest VM: Run the SSH tunnel.
- Steps:
- Connect the VPN on the host OS.
- Start the virtual machine and connect the SSH tunnel on the guest OS.
- Your traffic will be routed through the VPN and then through the SSH tunnel.
- Using Proxy Settings in VPN Clients:
- Some VPN clients allow you to configure proxy settings.
- You can configure the SSH SOCKS proxy in the VPN client to route VPN traffic through the SSH tunnel.
Key Considerations
- Firewall and Leak Protection:
- Ensure that your SSH and VPN clients have firewall rules and leak protection to prevent accidental traffic leaks.
- Port Forwarding:
- Use local port forwarding (
L) to forward traffic between SSH servers.
- Use local port forwarding (
- Dynamic SOCKS Proxy:
- Use dynamic SOCKS proxy (
D) to create a proxy that can be used by your browser or other applications.
- Use dynamic SOCKS proxy (
- Verbose Mode (
v):- Use verbose mode to see detailed output and debug any issues with your SSH connections.
Nested SSH tunnels provide a powerful way to enhance privacy and anonymity by routing your traffic through multiple SSH servers. You can create two-hop or three-hop tunnels using dynamic SOCKS proxies and local port forwarding. Additionally, you can mix VPN and SSH to create even more secure and complex tunnels.
To ensure maximum security, use firewall rules, leak protection, and test your setup to avoid configuration errors.
Chaining Proxies with ProxyChains
Introduction to Proxy Chaining
- What is Proxy Chaining?
- Proxy chaining involves routing your traffic through multiple proxies to enhance anonymity.
- The idea is that by bouncing your traffic through multiple proxies, it becomes harder for adversaries to trace your connection.
- Limitations of Proxy Chaining:
- Unlike Tor, VPNs, or SSH tunnels, proxy chaining does not encrypt the connection between each proxy server.
- An open proxy can see all the other proxies being used and the IP address of the previous proxy, reducing anonymity.
ProxyChains Overview
- What is ProxyChains?
- ProxyChains is a popular tool for chaining proxies on Linux.
- It is available by default in Kali Linux and can be installed on Debian-based systems via the repository.
- How ProxyChains Works:
- ProxyChains sends your traffic through a series of open web relays (proxies) before reaching your final destination.
- Unlike Tor, ProxyChains does not encrypt the traffic between proxies, making it less secure.
Setting Up ProxyChains
- Configuring ProxyChains:
- The configuration file for ProxyChains is located at
/etc/proxychains.conf. - You can edit this file to add your list of proxies.
- The configuration file for ProxyChains is located at
- Dynamic vs. Strict Chains:
- Dynamic Chains: Traffic will go through the proxies in the order you specify, but it will skip dead proxies.
- Strict Chains: Traffic will go through the proxies in the specified order and will not skip dead proxies.
- Random Chains: Proxies are selected in a random order.
- Editing the Configuration File:
- Set the proxy chain length (e.g., 3 proxies).
- Enable proxy DNS requests to ensure DNS queries are routed through the proxies.
- Add your list of proxies in the correct format (e.g., SOCKS5, HTTP).
- Proxy Formats:
- SOCKS5 Proxy:
socks5 <IP> <port> <username> <password> - HTTP Proxy:
http <IP> <port> <username> <password>
- SOCKS5 Proxy:
Running ProxyChains
- Command Syntax:
- Use the following syntax to run a command through ProxyChains:
proxychains <command> - Example:
proxychains curl <http://example.com>
- Use the following syntax to run a command through ProxyChains:
- Common Issues:
- Many open proxies found online are either dead, misconfigured, or compromised.
- You may need to test multiple proxies to find ones that work.
Advanced Options
- ProxyChains NG:
- ProxyChains NG is an updated version of ProxyChains with additional features.
- It is worth checking out if you need more advanced functionality.
- Windows and Mac Proxifiers:
- ProxyCap: A paid proxifier for Windows and Mac OSX.
- ProxyFire: Another paid proxifier for Windows and Mac OSX.
- Both tools allow you to chain proxies and route traffic through them.
Proxifier – The Most Advanced Proxy Client
Proxy chaining with tools like ProxyChains can enhance your anonymity by routing your traffic through multiple proxies. However, it is less secure than Tor or VPNs because it does not encrypt traffic between proxies. To mitigate risks, ensure you use reliable proxies and test your setup thoroughly.
For Windows and Mac users, consider using paid proxifiers like ProxyCap or ProxyFire for more advanced proxy chaining capabilities.
Setting Up VPN + Tor: Enhancing Privacy and Anonymity
Introduction to VPN + Tor
- Why Use VPN + Tor?
- Combining a VPN with Tor provides an additional layer of security and anonymity.
- The VPN acts as the first hop, hiding your real IP address from Tor, while Tor provides multi-hop anonymity.
Setting Up VPN + Tor
- Using a Virtual Machine (VM):
- Host OS: Establish the VPN connection using a VPN client with leak protection and a kill switch.
- Guest OS: Run Tor in a guest operating system (e.g., Tails, Whonix Gateway, or a custom OS).
- Advantages:
- The VPN ensures that Tor cannot leak your real IP address.
- Running Tor in a guest VM provides isolation, reducing the risk of leaks.
- Tails or Whonix:
- Tails: A live operating system designed for anonymity, which can be run as a guest VM.
- Whonix Gateway + Workstation: Provides additional isolation by running the VPN on the gateway and Tor on the workstation.
- Custom OS:
- You can install your own guest operating system and configure Tor on it.
- The host OS still handles the VPN connection.
Key Considerations
- Kill Switches and Leak Protection:
- Ensure that the VPN client has a kill switch to prevent traffic leaks if the VPN connection drops.
- Running Tor in a guest VM ensures that it cannot access the internet if the VPN drops.
- Isolation:
- Running Tor in a separate VM or using Tails/Whonix provides additional isolation, reducing the risk of leaks.
- OPSEC (Operational Security):
- Using a VM setup reduces the need for strict OPSEC, as the VPN and Tor are isolated from each other.
Advanced Configurations
- Using a Hardware Router or Firewall:
- You can establish the VPN connection using a hardware router or firewall (e.g., PF Sense).
- This method is more complex but provides additional control over the VPN configuration.
- Whonix Gateway + Workstation:
- Use Whonix Gateway to establish the VPN and route Tor traffic through it.
- This setup keeps everything within Whonix, providing maximum isolation.
- Whonix VPN + Tor Setup:
- Whonix provides a guide on how to connect a VPN before Tor using its gateway and workstation setup.
- This is a more advanced configuration but offers strong isolation and security.
Connecting to Tor before a VPN
Setting up a VPN followed by Tor is an effective way to enhance privacy and anonymity. The VPN acts as the first hop, hiding your real IP address, while Tor provides multi-hop anonymity. Using a virtual machine setup (e.g., host OS for VPN, guest OS for Tor) is the easiest and safest method. For more advanced users, consider using hardware routers, PF Sense, or Whonix for additional isolation and control.
Always ensure that your VPN client has leak protection and a kill switch to prevent accidental traffic leaks.
Setting Up SSH + Tor: Enhancing Privacy and Anonymity
Introduction to SSH + Tor
- Why Use SSH + Tor?
- Combining SSH with Tor provides an additional layer of security and anonymity.
- The SSH tunnel acts as the first hop, encrypting your traffic, while Tor provides multi-hop anonymity.
Setting Up SSH + Tor
- Using a Dynamic SOCKS Proxy:
- Step 1: Set up a dynamic SOCKS proxy on your local machine using SSH.
ssh -D 8080 -v user@ssh_server - Explanation:
D 8080: Creates a dynamic SOCKS proxy on port 8080.v: Verbose mode to see detailed output.user@ssh_server: The SSH server you are connecting to.
- Step 2: Configure Tor to use the SSH SOCKS proxy.
- Open the Tor Browser settings.
- Enable the proxy option and configure it to use the local SOCKS proxy (e.g.,
127.0.0.1:8080).
- Step 3: Start Tor and verify that the traffic is routed through the SSH tunnel.
- You can see the traffic passing through the SSH server in the verbose output.
- Step 1: Set up a dynamic SOCKS proxy on your local machine using SSH.
- Multi-Hop SSH + Tor:
- Step 1: Create a multi-hop SSH tunnel using the command:
ssh -v -t demo.offsce.com ssh -t demo2.offsce.com - Step 2: Set up a dynamic SOCKS proxy on the second SSH server.
ssh -D 8080 -v user@demo2.offsce.com - Step 3: Configure Tor to use the SOCKS proxy on the second SSH server.
- Step 4: Verify that Tor traffic is routed through both SSH servers.
- Step 1: Create a multi-hop SSH tunnel using the command:
- Using Whonix for SSH + Tor:
- Step 1: Set up a dynamic SOCKS proxy on the Whonix Gateway using SSH.
ssh -D 8080 -v user@ssh_server - Step 2: Edit the Tor configuration file (
torrc) on the Whonix Gateway to use the SOCKS proxy:SOCKSPort 127.0.0.1:8080 - Step 3: Start Tor on the Whonix Gateway and verify that the traffic is routed through the SSH tunnel.
- Step 1: Set up a dynamic SOCKS proxy on the Whonix Gateway using SSH.
Key Considerations
- Dynamic SOCKS Proxy:
- The dynamic SOCKS proxy allows Tor to route its traffic through the SSH tunnel.
- Ensure that the SSH server is configured correctly and has no leaks.
- Multi-Hop SSH:
- Multi-hop SSH tunnels provide additional layers of encryption and obfuscation.
- Each hop adds a layer of security, making it harder for adversaries to trace your traffic.
- Whonix Integration:
- Whonix provides a secure environment for running Tor and SSH.
- The Gateway handles the SSH tunnel, while the Workstation runs Tor.
Setting up SSH followed by Tor is an effective way to enhance privacy and anonymity. The SSH tunnel acts as the first hop, encrypting your traffic, while Tor provides multi-hop anonymity. Using a dynamic SOCKS proxy, multi-hop SSH tunnels, or Whonix can provide additional layers of security and isolation.
Always ensure that your SSH server is properly configured and that there are no leaks in your setup.
Setting Up JondoNym + Tor: Enhancing Privacy and Anonymity
Introduction to JondoNym + Tor
- Why Use JondoNym + Tor?
- Combining JondoNym with Tor provides an additional layer of anonymity.
- JondoNym changes your IP address multiple times, while Tor provides multi-hop anonymity.
Setting Up JondoNym + Tor
- Installing JondoNym:
- Step 1: Install JondoNym on your device.
- JondoNym is an IP changer that routes your traffic through multiple proxies.
- Step 2: Configure JondoNym to run on your device.
- In Debian, you can configure JondoNym to run as a proxy on a specific port (e.g., 4001).
- Step 1: Install JondoNym on your device.
- Configuring Tor to Use JondoNym:
- Step 1: Start Tor and open its settings.
- Step 2: Configure Tor to use JondoNym as a proxy.
- Free Account: Use the HTTP proxy interface (ports 80 or 443).
- Premium Account: Use the SOCKS5 proxy interface for faster and more secure connections.
- Free vs. Premium Accounts:
- Free Account:
- Limited to ports 80 and 443.
- No SOCKS5 proxy support.
- Slower but usable.
- No money trail back to you, but there is an IP trail.
- Premium Account:
- Supports any port.
- Includes SOCKS5 proxy support.
- Faster and more secure.
- Free Account:
Key Considerations
- IP Trail:
- Even with JondoNym, there is still an IP trail back to you.
- Use Tor to further obfuscate your traffic and provide multi-hop anonymity.
- Performance:
- The free version of JondoNym is slower due to limited ports and no SOCKS5 support.
- Premium accounts provide faster and more secure connections.
Setting up JondoNym followed by Tor is an effective way to enhance privacy and anonymity. JondoNym changes your IP address multiple times, while Tor provides multi-hop anonymity. The free version of JondoNym is usable but slower, while the premium version offers faster and more secure connections with SOCKS5 support.
Always ensure that your setup is properly configured to avoid leaks and maximize anonymity.
Using Tor with SSH, VPN, and JondoNym
This discussion focuses on how to route SSH, VPN, and JondoNym traffic through the Tor network. The goal is to enhance privacy and security by anonymizing these services while ensuring proper configuration to avoid leaks.
Key Concepts
- Tor Modes:
- Tor typically operates as a SOCKS proxy on the operating system after installation.
- The Tor Browser is pre-configured to use this proxy.
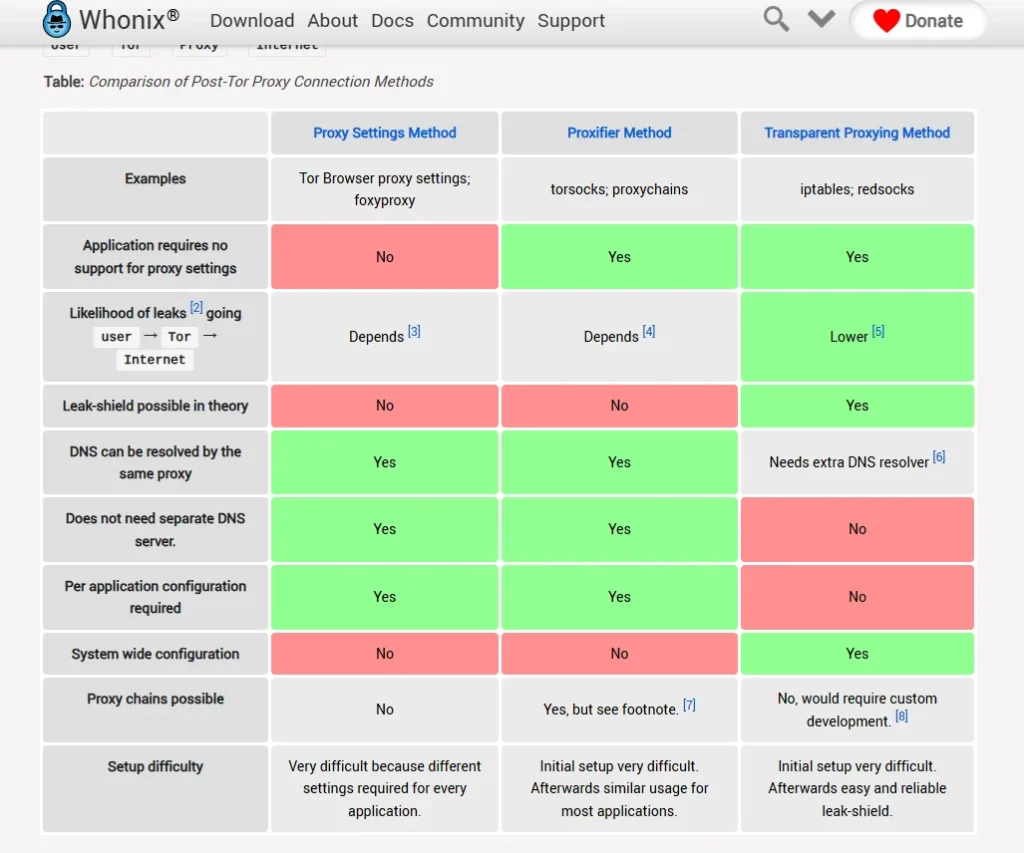
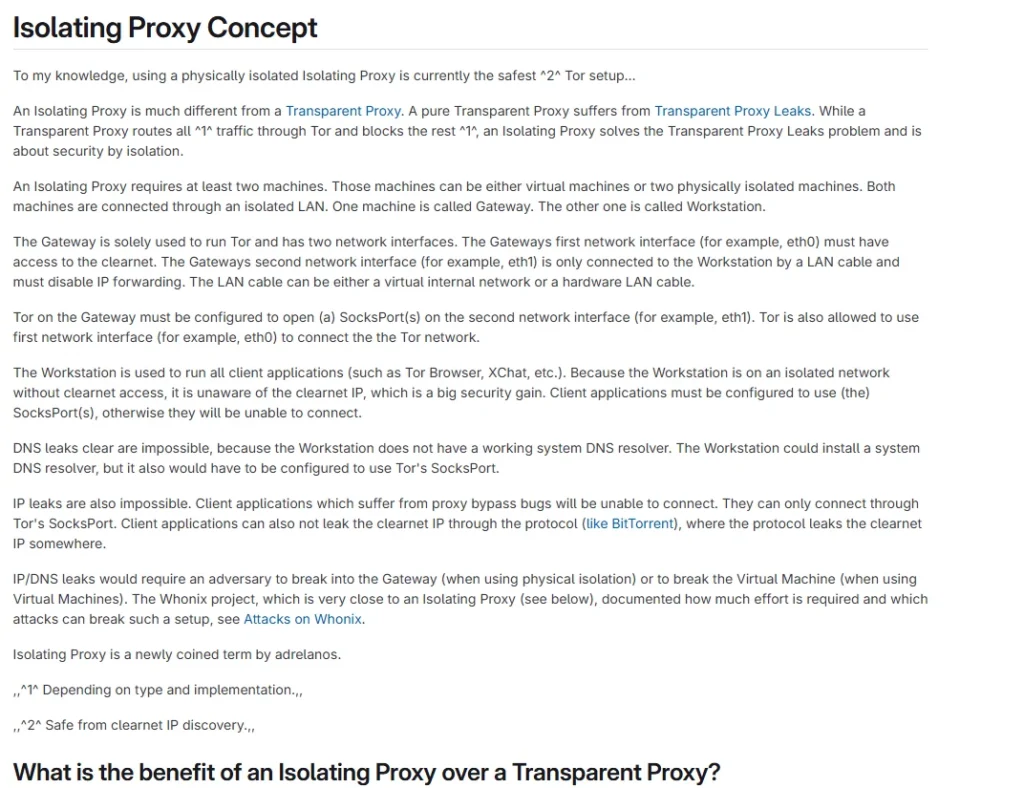
- Transparent Proxy:
- A transparent proxy forces all traffic through Tor, including applications like SSH, VPN, and JondoNym.
- This eliminates the need for manual proxy configuration in individual applications.
- Stream Isolation:
- Tor provides stream isolation, meaning each application or browser tab uses a separate Tor circuit.
- When using a transparent proxy, stream isolation is lost, but this is less of a concern when chaining additional services like VPN or SSH.
Challenges and Solutions
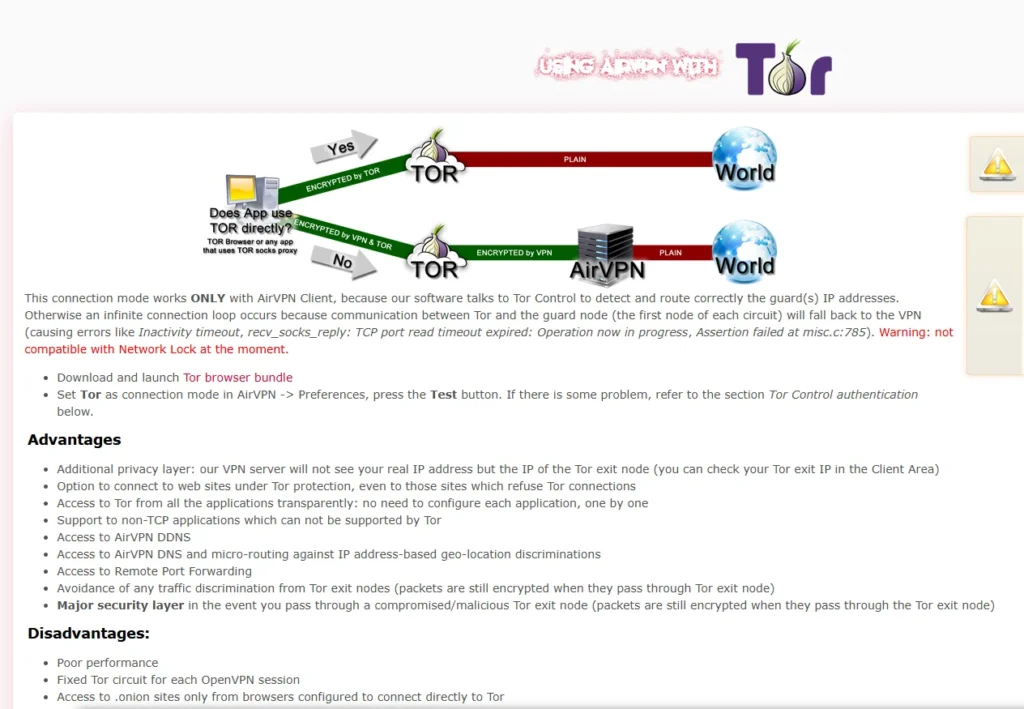
- VPN as the First Hop:
- If a VPN is enabled before Tor, it becomes the first hop, which is not ideal.
- The solution is to configure Tor as a transparent proxy to route VPN traffic through Tor.
- Transparent Proxy Configuration:
- To set up a transparent proxy, you need to modify the
torrcfile and configure firewall rules (e.g., iptables or PF) to force all traffic through Tor. - Examples include using OpenWRT, PF Sense, or custom Linux configurations.
- To set up a transparent proxy, you need to modify the
- Leak Prevention:
- Misconfigured transparent proxies can lead to leaks, potentially de-anonymizing the user.
- Tools like Corridor can help prevent leaks by whitelisting Tor traffic.
Tools and Methods
- Hardware and Virtual Routers:
- Devices like Portal or custom hardware routers can act as Tor transparent proxies.
- Virtual machines like Whonix can also serve this purpose.
- Custom Transparent Proxies:
- You can set up a transparent proxy on a standalone machine using OpenWRT or similar firmware.
- Firewall rules (iptables or PF) are essential for routing traffic correctly.
- Chaining Services:
- JondoNym: Configure the application to use a local proxy (e.g., port 4001) to route traffic through Tor.
- SSH: Use a dynamic SOCKS proxy to route SSH traffic through Tor.
- VPN: Ensure the VPN client uses TCP and is configured to route through Tor.
Practical Steps
- Setting Up a Transparent Proxy:
- Modify the
torrcfile to enable transparent proxy mode. - Configure firewall rules to force all traffic through Tor.
- Modify the
- Testing for Leaks:
- Use tools to test for leaks and ensure all traffic is routed through Tor.
- Chaining Services:
- Configure SSH, VPN, or JondoNym to use the transparent proxy.
- Ensure proper firewall rules are in place to prevent leaks.
TransparentProxyLeaks · Wiki · Legacy / Trac · GitLab
Routing SSH, VPN, and JondoNym through Tor enhances privacy and security by anonymizing these services. Proper configuration of transparent proxies and firewall rules is essential to avoid leaks and ensure a secure setup. Tools like Portal, Whonix, and custom configurations provide flexible options for achieving this.
Using Whonix Gateway with SSH, VPN, and JondoNym
This discussion focuses on using the Whonix Gateway to route traffic through Tor and then chain it with SSH, VPN, or JondoNym before reaching the internet. The Whonix Gateway is more than just a transparent proxy; it is an isolation proxy, offering better security and configuration options compared to other solutions.
Key Concepts
- Whonix Gateway and Workstation:
- The Whonix Gateway acts as the first hop, routing traffic through Tor.
- The Whonix Workstation is where applications like SSH, VPN, or JondoNym are configured.
- Stream Isolation:
- By default, Whonix applications use the Tor SOCKS proxy for stream isolation.
- However, when chaining SSH, VPN, or JondoNym, stream isolation must be disabled to ensure these services are the final hop.
- Transparent Proxy vs. Isolation Proxy:
- A transparent proxy forces all traffic through Tor, but it does not provide stream isolation.
- An isolation proxy ensures that each application uses a separate Tor circuit, enhancing privacy.
Challenges and Solutions
- Stream Isolation Conflict:
- If applications are configured to use the Tor SOCKS proxy, they will bypass SSH, VPN, or JondoNym.
- To resolve this, disable the SOCKS proxy settings in the applications that need to use SSH, VPN, or JondoNym as the final hop.
- Removing Stream Isolation:
- Disabling stream isolation reduces privacy but is necessary for chaining services like SSH, VPN, or JondoNym.
- This can be done by removing proxy settings in applications like the Tor Browser.
- Multiple Workstations:
- To maintain privacy, consider using multiple Whonix workstations for different identities or activities.
- This ensures that traffic for each activity is isolated.
Practical Steps
- Setting Up SSH with Whonix:
- Install SSH on the Whonix Workstation using
sudo apt-get install openssh-client. - Create an SSH tunnel using the standard command, which will create a SOCKS5 proxy.
- Refer to the Whonix documentation for detailed instructions on configuring SSH.
- Install SSH on the Whonix Workstation using
- Setting Up VPN with Whonix:
- Ensure the VPN uses TCP instead of UDP, as UDP does not work over Tor.
- Install OpenVPN on Linux using the instructions provided in the VPN section.
- Configure the VPN client to connect to the server using TCP.
- Setting Up JondoNym with Whonix:
- Install JondoNym on the Whonix Workstation using the provided commands.
- Start JondoNym, which will create a local proxy on port 4001.
- Use the
curlcommand to test if JondoNym is working correctly.
Using the Whonix Gateway to route traffic through Tor and then chain it with SSH, VPN, or JondoNym provides a secure and flexible solution for enhancing privacy. While disabling stream isolation reduces some privacy features, it is necessary for chaining these services. Always refer to the Whonix documentation for the latest configuration options and best practices.
Advanced Multi-Hopping with Virtualization and PFsense
This discussion explores advanced multi-hopping techniques using virtualization and PFsense to enhance privacy and anonymity. While more complexity can introduce security risks, understanding these methods allows for highly customized setups.

Key Concepts
- Multi-Hopping:
- Multi-hopping involves chaining multiple VPNs, Tor, and other services to create a more complex and secure route to the internet.
- Each hop adds a layer of security and anonymity, but also increases complexity.
- Virtualization:
- Virtualization is essential for creating multiple layers of security. Each virtual machine (VM) can act as a separate hop in the chain.
- Tools like PFsense and Whonix Gateway are commonly used in these setups.
- PFsense:
- PFsense is a powerful open-source firewall and router platform that can act as both a VPN client and server.
- It is ideal for creating nested VPN chains and routing traffic through Tor.
Challenges and Solutions
- Complexity and OPSEC:
- More complexity increases the risk of operational security (OPSEC) errors.
- A simpler solution may be more secure if it meets your needs.
- Networking Setup:
- Proper networking configuration is critical when chaining multiple VPNs and Tor.
- PFsense simplifies this process by allowing you to route traffic through multiple VPNs and Tor tunnels.
- Isolation:
- Using multiple virtual machines ensures that each hop is isolated from the others, reducing the risk of cross-contamination.
Practical Steps
- Setting Up PFsense for Multi-Hopping:
- Install PFsense as a virtual machine.
- Configure PFsense to act as a VPN client and route traffic through multiple VPNs.
- Use PFsense to create nested VPN chains, with each PFsense VM acting as a separate hop.
- Chaining VPNs and Tor:
- Use PFsense to establish multiple VPN connections.
- Route traffic through Tor using the Whonix Gateway VM.
- Ensure that each VPN and Tor hop is properly configured to avoid leaks.
- Using Multiple Workstations:
- Use multiple Whonix workstations for different aliases or activities.
- Each workstation can be configured with its own VPN and Tor setup, ensuring isolation between identities.
Example Setup
- Alias 1:
- VPN1 (Hardware/Virtual Router) → VPN2 (Host OS Client) → VPN3 (PFsense VM) → Tor (Whonix Gateway) → VPN4 (Whonix Workstation 1).
- Alias 2:
- VPN1 (Hardware/Virtual Router) → VPN2 (Host OS Client) → VPN3 (PFsense VM) → Tor (Whonix Gateway) → VPN4 (Whonix Workstation 2).
Advanced Privacy and Anonymity Using VMs, VPN’s, Tor – Part 6
Advanced Privacy and Anonymity Using VMs, VPN’s, Tor – Part 8
Tor vs. VPN: Which one to choose? | NordVPN
Fast VPN provider – USA/UK/EU VPN nodes on PPTP, OpenVPN and SSH proxy
Advanced multi-hopping with virtualization and PFsense provides a highly customizable and secure way to enhance privacy and anonymity. While more complex setups can be powerful, they also introduce risks. Always ensure proper configuration and consider using simpler solutions if they meet your needs.
Conclusion
Nesting privacy and anonymity services like proxies, VPNs, SSH tunnels, Tor, and I2P can significantly enhance security and anonymity, but it requires careful setup to avoid vulnerabilities. Each service adds a layer of protection, but also complexity, which can lead to mistakes if not managed correctly. The choice of services and their configuration should be based on the specific threats you are trying to mitigate.